Showing posts with label remodel. Show all posts

Saturday, March 12, 2011

The Kitchen - After

remodelFor a recap of what the kitchen looked like when we moved in, click here.  It was pretty bad.  Lets take a peek at what it looks like now...


It looks a little different.  Here are some of thet hings we did:

  • New sheetrock
  • New window
  • New pantry door
  • New wiring
  • New subfloor
  • New sink
  • Plumbed for an icemaker
  • Moved the dishwasher
  • Got rid of the ceiling fan
  • Added additional lighting over the sink and bar
  • Widened the counter over the bar

Originally the dishwasher was at the end of the bar, but we felt it made more sense to put it next to the sink.  If you look closely, you can see it to the left of the sink in the pic above.  The ceiling fan wasn't doing it for us, so we swapped that with a flush mount fixture in the center of the room.  We put up a couple of other lights and created a space for The Boy to eat breakfast.  Butcher block countertops with a food safe finish, solid wood cabinets, and some brick finish it off.  We DIY'd everything in this room (with help from some friends).

Let's see, what else?  We have this faucet and the matching soap dispenser in chrome.  We put in a garbage disposal (I think every kitchen needs one), and this time we sprung for the midlevel.  Stainless steel components- yeah we're big spenders.  We also sprung for a middle of the line hood vent from Lowe's.  The oven and the dishwasher were reused, so we bought a new fridge to match (a floor model from Lowe's).  We are pretty cheap frugal, so I hate to buy things that we don't need.  I did make an exception in this kitchen.  We had a stove that we intended to reuse.  It was a counter insert type of stove with coil burners.  One day while wandering the aisles of our home away from home we stumbled upon this baby.  At the time it was priced a little over a grand.  We found one that had been returned and repaired and the manager cut us a deal; $225 later it was ours.  For that price we couldn't pass it up!  Lowe's loved us that year. 


We kept the pantry in the same place, but added an outlet to the inside of the pantry while the kitchen was being wired.  I have this thin about cluttered counters- I don't like them.  Our microwave lives in the pantry, and I love the fact that it is out of sight.  Originally I didn't want any appliances to live on the counter, but I broke that rule with our coffee maker.  It deserves a post all its own, because it is the best coffee maker ever!

The kitchen turned out pretty well.  It's very functional, makes good use of the space and seems larger than its dimensions would suggest.  My biggest complaint about the kitchen is that is a lot of dark tones, but I have big plans (I have to convince The Boy's Daddy, but I've been easing him into the idea).


Thursday, March 10, 2011

The Boy's Room - After


When we started the remodel, The Boy had just turned one, so we decided that his room should not be a nursery.  We felt that he needed a big boy room that could easily grow with him.  We paired a neutral wall color with a fun light fixture and let the furniture and accessories do the rest. 

In the few years since we moved into our house the room has continued to evolve.  The crib was replaced by a toddler bed which has since been replaced by a big boy bed, but the bones of the room have remained the same. 

The Boy's Room currently looks like this:


The Boy loves sports.  He loves from football and baseball to tennis and golf!  He also loves Toy Story.  See the pillow on the bed?   There is a matching comforter.  We swap between the two every couple of weeks.


The jersey in the shadowbox is an Ole Miss jersey from the Boy's uncle.  I have no idea whose jersey is is, but The Boy loves it.


The dresser belonged to a close family friend who passed away.  The Boy's Daddy thinks that it is too small.  I can't imagine giving it away, but it may find a home somewhere else in the house.


We wanted a room that would grow with The Boy, and I think we succeeded.  From the neutral wall color to the sports themed photographs and memorabilia this room could almost belong to a teenage boy (the action figures would probably be a tip off though).

With the exception of the Buzz Lightyear on the dresser and the action figures on the shelves above the headboard, there aren't any visible toys in The Boy's room (when it's clean).  Don't feel too bad for him though...

Did you notice the left wall of the closet?  Let's take a closer look.

I can't take all the credit.  My sister gave The Boy this wall tattoo, but I did decide where it put it.  I like it.  I think it gives the room character.  I'm not sure that the light fixture adds any whimsy or charm, but The Boy and his Daddy won that fight.


Friday, January 28, 2011

Downstairs - Before

The laundry room and half bathroom aren't really worthy of their own before posts, so I'm going to lump them in with the den.  This portion of the house is where we made the biggest change to the layout.  This is what the den looked like when we took possession of the house:

Through the door on the left hand wall (in the second picture) is another bedroom.  I don't have any before pictures of that room. (oops!)  Both the laundry room and the half bathroom are located off of that bedroom as well as an exterior entrance.  (If you need a quick refresher on the layout you can find one here.)  The half bath looked like a bad gas station restroom, and the laundry room wasn't even as nice as the half bath.


Yikes


Lets recap the downstairs:

Den
  • Sheetrock over paneling - check!
  • Uneven walls due to said sheetrock - check!
  • Wallpaper - check!
  • Tile not properly adhered to the floor - check!
  • Grout everywhere but under the couch - check!
Half Bath
  • Sink hanging from the wall - check!
  • Dingy tile - check!
  • Gross concrete block - check!
Laundry Room
  • More gross concrete block - check!
  • Concrete floor with peeled paint - check!
  • Sheetrock removed to uncover the return air vent - check!
Looks like everything is accounted for!


Thursday, January 27, 2011

The Kitchen - Before

Here is a tip for those of you thinking about fixing a leaky sink with duct tape...Don't!  I wish someone had given that tip to the previous occupants of our house.  When we walked through after the renters left the kitchen looked like this:


Kitchens and baths are notoriously expensive to remodel.  We were hoping that the kitchen would be functional enough that a major reno could wait a while.  Alas, it was not to be.  Soon the kitchen would look like this:


Look, a picture taken during the remodel process.  Enjoy it; it may be the only one I can find.
 
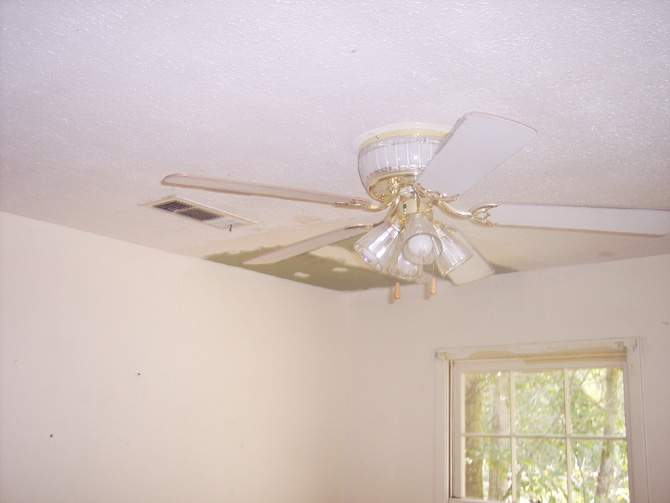
How about that surface mold...lovely!  Check out the light fixture in the shot below... We live in the south, so I completely understand having ceiling fans in the house.  In fact we still have several of them, but I didn't understand having one here.  Also below, our original color choice for this room.  Okay, I'm kidding.  That color choice can't be attributed to the renters either.  Prior to my parents buying the house the entire kitchen (including cabinets) was that color.  I actually don't hate the color.  I think it could look great on the right piece of furniture!


We did a lot in this room.  It was another room that had to have a new subfloor.  It always fun to gaze into your kitchen and see into the crawlspace beneath the house.


Wednesday, January 26, 2011

Main Bathroom - Before

So the guest bathroom was just more of the same.  I can't remember if we tore out all of the sheetrock or just most of it.  I think that we were able to leave the ceiling in place.  I do remember that we did not remove the subfloor in this bathroom, yay!


While I haven't hung wallpaper in years, I don't remember the need to cover each seam with a piece of trim...

Tuesday, January 25, 2011

Living Room - Before

I should probably title the post "Watch Your Step!"  Our front door opens directly into the living room (we're not cool enough to have a foyer), so the hole in the floor was pretty obvious to anyone who stopped by to say hello.  I'm sure that we didn't make the problem more obvious when we'd say, "Come on in and watch out for the giant hole in the floor."  We really didn't want anyone to get hurt, so we figured that we'd better fix it.  Here is a peek at what we were dealing with:


Yeah, it was a bit of a hazard, but an easy fix.  You know what the worst part was?  When we took out pieces of floor to expose all of the affected subfloor we could tell where they'd patched the subfloor and the floor planks before.  Seriously... you can't fix just the damage; you've got the fix the problem!  TBD's buddy is a floor guy, so once we fixed the subfloor he handled the hardwood repair for us.

I was pretty excited about the 15 lite door that the renters installed to divide the den from the living room; it's agreat way to separate the space without closing them off completely.  I wasn't quite as excited about the mini blinds.  The handrail in the other stairwell left a little to be desired too.  I am of the opinion that the handrail should run the length of the stairs.


We had one other quirky design element to contend with.  The picture is probably hard to see, but look closely and you'll see the texture that was the envy of the neighbors in 1994.  It was put on the wall to cover a bad patch job.  The patch filled in the hole left in the wall when a window was removed (when my parents bought the house).  You'd think that the window would have been removed when the garage was added.  I guess the previous owners liked to be able to check on their tools/car without opening the door; how convienent!


Monday, January 24, 2011

The Master Bedroom and Master Bathroom - Before

Originally our bedroom had some pretty serious ceiling issues; it was gross. 


I also didn't understand the thought process behind this sconce...why just one, why there, and why that one?  Random.


Besides those two things, the master bedroom was in pretty good shape.  It just needed the same basic stuff as the rest of the house: framing for normal closet doors, new windows, new electrical, a new light fixture, new interior doors, trim, refinished floors and paint.  Just your standard stuff that everyone has to deal with before they can move into their house, right?


The master bathroom was a completely different story. 


Absolutely nothing in this room was salvageable; we gutted it to the studs.  Even some of the floor joists had to be replaced.  I wish I had an in progress shot, but you can picture it; open the bathroom door and you can see the half bathroom below it.  The good part about all this was that opening up the wet wall between the bathrooms gave us the opportunity to see just how much plumbing repair would be needed, hooray!  The bad part was that we'd have to get rid of that awesome wallpaper.  So I'm exagrating.  There was no good or bad part; it all just meant more work!


We actually made the master bathroom just a little bit bigger by stealing a couple of square feet from the bedroom.  I think that we pushed the wall back by 18" (maybe 16").  Let me tell you, that foot and a half made a huge difference in the feel of the room. 

The bathtub was removed and a shower was put in its place.  An interesting fact about that bathtub...if you look closely you can see that the drain is on one end and the tub controls are on the other.  That is my mom's handiwork.  When they acquired the house this room was plumbed for a bathtub, but there was no bathtub.  So, it was either leave this setup, or choose between moving plumbing to the exterior wall of the house or lowering the ceiling in the half bath below this room.  She choose the easy option (and I don't blame her).


I told you that the bathroom wasn't pretty...
 

How about a little perspective on just how small this room was.  See the edge of the doorframe on the left of the picture?  See the toilet?  Well, there was a sink between the two.


Saturday, January 22, 2011

What you Talkin' Bout Willis

I've been thinking about the changes that we made to the layout of the house (there weren't that many), and I think that a visual aid might be helpful.  I tend to ramble and such, so this may help clarify things.  The original budget (and timeline) for a "fix it up quickly so we can move in" remodel was small.  We were going to keep the layout of the house untouched so that we could save money and get things finished quickly.  We blew through the original budget (and then some) and made minimal changes to the layout.  So yeah, our plan failed- oh well! 


Here is the main level of the house; the front door is right by the coat closet (isn't that convenient).  For some reason, the wall that blocks off the kitchen doesn't quite block the whole kitchen.  It stops about a foot from where the kitchen floor ends (the back of the cabinets - a logical place).  Why the wall didn't stop the same place is beyond me.  Random!


Main Level
 

This is the top level of the house.  Three bedrooms and a couple of bathrooms.  Pretty basic stuff.


Top Level


The bottom level of the house (you could tell from the header that the house was a split level, right?).  I know that I didn't include measurements in the drawings, but let me point out that the den is right at 22' deep.  The more narrow portion of the room (by the stairs) is 8' wide.  What does one do with a room that deep and narrow?  It is too narrow to really make zones (since the logical placement for the TV is next to the stairs), but if we didn't create zones the TV characters would looks like little tiny army men (the green ones).  We were perplexed.  Also the half bath - yeah, it's 5' wide and 10' deep...

Bottom Level


Thursday, January 20, 2011

The Boy's Room - Before

The Boy's Room required minimal work to whip it into shape.  Once the new electrical was run, the necessary patches were made, the ceiling patch job was fixed, and the closet was framed for new doors


It started out like this.
We inherited that terrible patch job; it is not our handiwork. 


The picture quality and composition are terrible.  We don't have very decent before pics.

This room really wasn't too bad.  It was almost livable - except for the whole wires hanging out of the wall thing.

I know everyone is lovin that ceiling fan and hoping that we kept it.  You'll just have to wait a bit longer to find out...

Tuesday, January 18, 2011

The Plan

Once we were mostly aware of the scope of the project we were undertaking we decided it was time to devise a plan.  Here is what we came up with:


  • The windows would all be replaced.
  • The original hardwoods would be refinished.
  • All wiring would be replaced as well as the sub-panel, receptacles, switches and light fixtures.
  • Plumbing issues would be dealt with as they arose.
  • The interior hollow core doors would be replaced with interior wood doors.
  • The main bathroom would be gutted.
  • The bedrooms would all be patched up and painted.
  • The master bath would be made slightly bigger and a custom shower would be built.
  • The kitchen would be gutted.
  • The wall dividing the den would be removed to enlarge the space.
  • The laundry room would be reconfigured to support the addition of a mop sink.
  • The half bath off the den would be reconfigured.
It looks like a short list, but it took a very long time to complete!

Monday, January 17, 2011

Making the House Livable

As we prepared to launch Operation Paint the House the tenants finished moving the rest of their things.  Once we got the chance to do a thorough walk through we realized that Operation Paint the House needed to be postponed.  Before we could make the house pretty we needed to make it livable. 


The kitchen had to be gutted. 
(You can't tell by looking at this picture, but the tenant fixed the leaking sink with duct tape - bad move!)


The hole in the living room floor needed patched.


The tile and wall situation in the den needed to be addressed.  (Apparently tile should stay secured to the floor when you walk on it, and grout should be between all of the joints.)

The tenant re-tiled the floor.  The couch must have been on the back wall; they didn't grout under it.  The bottom half of the walls was paneling.  They decided to sheetrock, but they didn't take down the paneling first.  Yes that does mean that the walls had a noticeable change in thickness.


I also had a hang-up about being scared of my own shower.


What else?  Oh yeah, coax cable is not an adequate substitute for romex.  A/C ducts should not have holes in them.  Speaker wire should not leave scorch marks on your pants if you accidentally touch it in the attic.  And since we are just so picky, we decided it would be nice for the garage door to actually open (amongst other things).  


Painting would have to wait.